Kids Aprons from Kitchen Towels
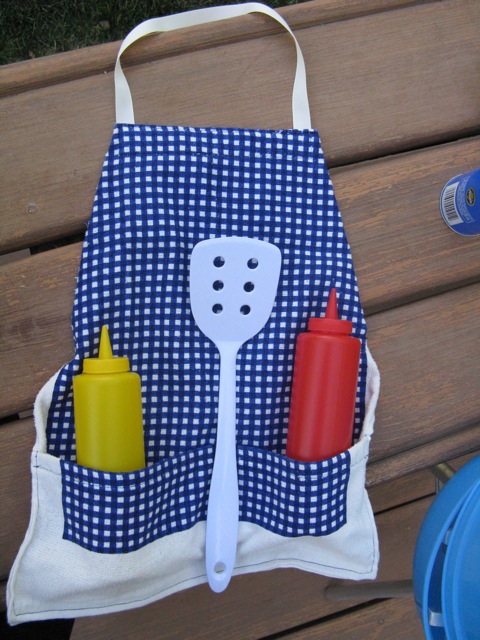
Now that you've got a play grill you're going to need a grilling apron. Today I'd like to show you how to make a kids apron out of a kitchen towel. It is super easy and the perfect sewing project even for someone who rarely sews (but has a sewing machine).
Oh did I mention this project is cheap? For the one I made above I used a kitchen towel and a spool of grosgrain ribbon both from the dollar store. Even the cute girlie towel I used for the one at the bottom was only $2.50 at Walmart.
For this towel I cut off the top 7", folded over the blue part 1" and hemmed it.
Then I rotated it and put it at the bottom of the towel to make a pocket. Since the sides and bottoms are already finished I just sewed the two layers together (leaving the hemmed top open obviously : ) ), then I sewed up the middle to divide it into two pockets.
For the top I folded the towel in on each side until the top was as wide as I wanted it to be. Then I folded down the top twice and hemmed it along with the ribbon for the neck strap. Notice the ribbon is folded under the towel to seal it in. Alternatively, you can do the neck strap with D-rings to make it adjustable (which is really nice, and actually easier). You can read how to do that from my other apron post here.
I'll warn you, folding the top over twice did make it bulky. For the cupcake apron I just folded it over once so the cut edge was exposed. I don't have a serger, so I just zig zag stitched across the bottom edge to keep it from fraying. It was kind of ugly on the front though, so then I added a strip of ribbon to cover that up. I used three different ribbons that were all left over from various projects so I didn't have enough to go all the way across the inside of the top, but if you did have enough ribbon, that would look nicer. And yes, one of my ribbon ends got folded under and sewed like that. And yes, I was too tired to fix it. And yes, I start most of my sewing projects after 10 p.m. If I slept I'd never get anything done!
Anyway, it looks nice on the front though, right?
Finally, I added the side ties basically the same way as the top strap. I folded the ribbon under the side of the angled towel and then sewed around the ribbon in a squarish shape. Like this.
Now the back looks like this.
and the front looks like this
Or like this.
And you are ready to bake, or cook, or grill. Kitchen towels are always on clearance somewhere, especially after holidays. I find myself looking through them now always thinking that would make a cute apron!
Thanks for reading!
- Haley


Oh my goodness. These are absolutely adorable. Great work!
ReplyDeleteThanks Jodi!
DeleteClever idea!!! So easy to make and they both look great!!! I do like your addition of the pockets. I would love for you to share this at our ongoing linky that's just for Aprons..
ReplyDeletehttp://threadingmyway.blogspot.com/2012/02/threading-your-way-aprons-and-art.html
Thanks Pam! I linked up this tutorial and my other kids apron tutorial on making aprons from a vinyl tablecloth. What a great link party!
DeleteWow.....awesome idea!I would love to try like this for my kids.
ReplyDeletewww.blissfulsewing.blogspot.com
Thanks for stopping by! I checked out Blissfulsewing and you have some super cute sewing projects going on there! Way cute : )
DeleteReally cute. That would make a great gift too. Thanks for linking up at Mom's Library!
ReplyDeleteSo cute. I've been wanting to make an apron for my daughter, and this looks like something I could handle. I love the pockets in front.
ReplyDeleteThanks for coming by Michelle! These are really so easy to make. Your little cutie will love it! Good luck!
DeleteThose are adorable aprons!
ReplyDeleteReally adorable! I love to cook with my little girls, so they can use some cute aprons like these! Thanks for sharing! Liz
ReplyDeleteHi Haley, I've featured your Kids Apron today...
ReplyDeletehttp://threadingmyway.blogspot.com/2012/08/threading-your-way-features.html
Thanks Pam, I feel honored! : )
DeleteThis is sooo cute! I have two boys and one girl close in age and this would save me time and money! Thank you for sharing!
ReplyDelete